Wednesday, January 11, 2017

*HCLF VEGAN Pancakes*

0

Is there any better way to start a day than with pancakes? No, I don't think so.
So here you have my go to Vegan and Healthy pancakes recipe!


Ingredients:
  • 1 and 1/2 cup of oats (You can use oat flour too)
  • 1 cup any plant milk. I used soy.
  • 1 RIPE banana. (If not ripe enough 30 secs in the microwave will do just fine)
  • 2 or 3 teaspoons of sugar. I used coconut.
  • 1 teaspoon cinnamon (optional)
  • 1 teaspoon vanilla extract (optional)
Steps:
  1. Put all the ingredients in a food processor.
  2. Preheat a pan in medium heat.
  3. Pour the mix over the pan (use margarine or a little bit of oil if the pan isn't non stick)
  4. ENJOY YOUR PANCAKES! You can top them with anything you want, peanut butter, maple syrup, buckwheat, anything your heart desires!

If you make them tell me how it works!
This is just like a simple recipe, you can add cocoa powder, chocolate chips, shreded coconut, anything!

xoxo
Josie

Wednesday, January 4, 2017

* VEGAN Banana Bread *

0

Hello everyone! 
Once again I'm SO sorry I haven't been active for a LOOOOONG time. College just got me super busy, but now I'm on my summer holidays so (let's pray) I have more free time to dedicate to this blog :).
In August this year i fully committed to the vegan lifestyle and today I'm giving you my VEGAN banana bread recipe. It's super duper good and it's High Carb Low Fat so for all the hclf vegans out there here you go:


Ingredients:

  • 4 ripe bananas (PLEASE USE RIPE BANANAS IF NOT IT'S GONNA BE HARD TO MASH THEM).
  • 2/3 cups (around 150grams) coconut sugar (can be replaced with any other kind of vegan sugar)
  • 2 cups (250gramos) wholewheat flour.
  • A teaspoon of vanilla extract.
  • 1 1/2 teaspoon of baking powder.
Instructions:

  • Preheat the oven at 180/190° Celsius.
  • Smash the bananas in a bowl. (Tip: if your bananas are not ripe enough you can put them without the peel in the microwave for 30 seconds to make them softer)
  • Add the rest of the ingredients and mix until smooth.
  • Put the mix in a baking mold. If it isn't a non stick mold use some oil or margarine.
  • Bake for about an hour. Check it constantly so it doesn't burn. 
And tadahhhh enjoy with some peanut butter, jam, vegan caramel spread or by itself.
It's super delicious and you should try it ASAP!

xoxo
Josie

Tuesday, March 1, 2016

*Bliss Balls*

0

I just wanted to let you know that beside being a fashion lover, I'm also a foodie sooooo, this time I have a recipe for you guys!
I love healthy and delicious food, but It's quite hard to get good and natural snacks sometimes...
so I decided to show you guys what I make to avoid eating super processed food and also getting in all the protein and carbs I need!

Here are my *Protein Bliss Balls*


Recipe (makes 18 of this babes):
  • 100grms (1 cup) of prunes (you can use pitted dates too).
  • 120grms (1 cup) almonds.
  • 1 Scoop vanilla protein powder (Optional if you want to give this balls a punch of protein).
  • 1 teaspoon of vanilla extract.
  1. Soak the prunes or dates in warm water for about 5 mins.
  2. Put the prunes or dates in a food processor and add only 2 tablespoons of the water they were soaking in.
  3. Add the rest of the ingredients in the food processor and process until you get a sticky texture.
  4. Make little balls with your hands.
  5. Put them in the freezer for a few hours or leave them overnight.
  6. Enjoy!!!


I swear these are super easy and yummy! Hope you like them and if you try them let me know what you think!

Love Jo xoxx

Friday, April 10, 2015

*Late* March Favorites!

2

Hi guys!!
I'm back... finally. I know it's been a while since my last post, but I had some problems and couldn't handle the blog any more. But now I'm back because I though that maybe this blog was what I needed.
Ok, I'm done with the chatting about *me*...

So today I have my MARCH FAVORITES!!
I know, it's kind of late for a favorites, but I don't care ;)

You might not know, but I've been to London in January and I bought quite a lot of new products that I've been trying over the last two months, and these are my favorite:


After hearing many positive comments about the Real Techniques brushes, I decided it was time for me to have one! I bought the Real Techniques Shading brush. It really is amazing, it's really soft and nice. I use it with my concealer, especially for my under-eye zone. (You can get it here)


Next is the Rimmel London Scandal Eyes waterproof Kohl Liner in Nude. I LOVE nude eyeliners, I really like to put it in my waterline I feel that it kind of "opens" my eye. I used to use white liners, but when I found this nude one I couldn't help but trying it and thanks GOD! Really a must-have. (You can buy it here)


Ok, I've never been into the "brow make-up team" until I decided to but the Benefit Instant Brow pencil. If someone would have told me that filling up my brows would make me feel so confident before I wouldn't have waited so long to start doing it. This pencil is so easy to work, and also the brush it has it's really useful. (You can buy it here)

I would like to thank Fleur de Force for ranting so many times about this concealer. It's the best (and cheapest) concealer ever. It has a great coverage and it makes a great combo with the Real Techniques shading brush. My under-eye has never been so covered ;) (You can buy it here)


My next favorite last month was the Mac Lipstick in Shanghai Spice. For me it's the perfect everyday nude. I can't live without lipstick, but I can't go everywhere wearing red lips (as much as I would like to). But really this lipstick is your lips, but better. 


I've been dying to try the Maybelline Baby Lips for so long that when I saw them I instantly picked one up and bought it. It was hard to decide a shade, but as always I went with the bright reddish color. The shade it's called "Cherry Me" (Isn't it cute!). Besides being cute, It's a really good lip balm and the color isn't as bright as I was expecting, but it leaves your lips a really nice and juicy shade. (You can buy it here)


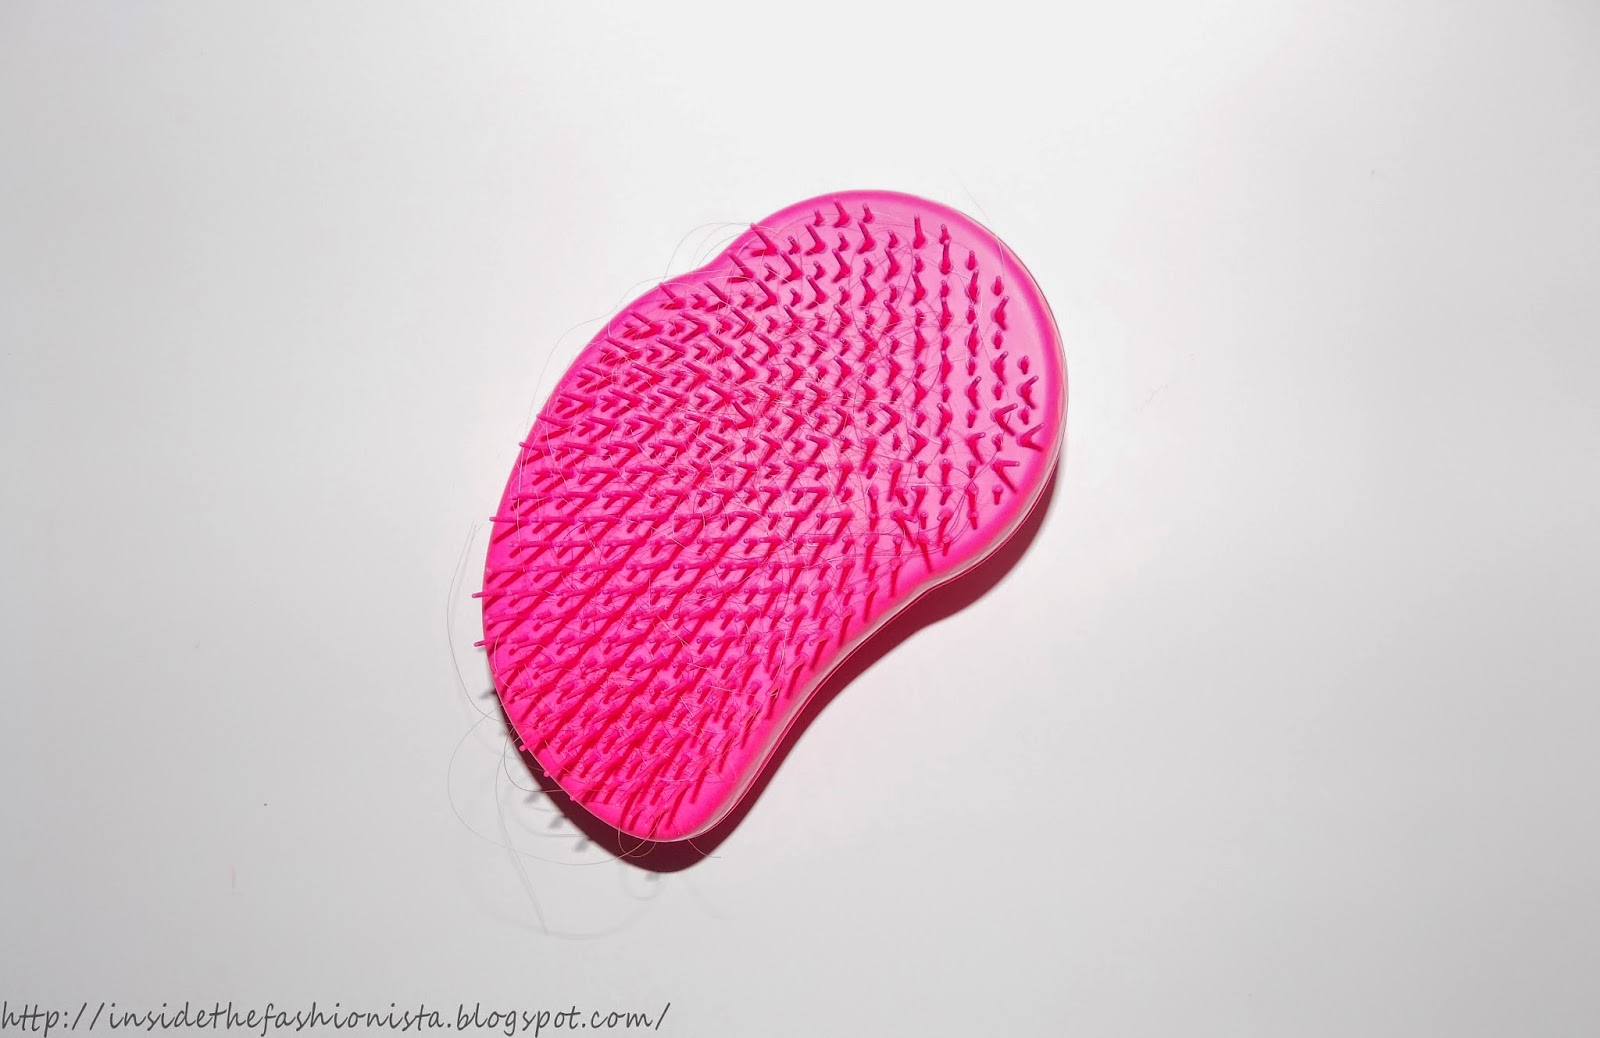
 Would you believe me if I told you that there's a magical hair brush that can untangle any tangle? Well, If your answer was "No", I introduce you to my newest friend the "Tangle Teezer" Enough said. BEST-HAIR-BRUSH-EVER. (Buy it here)


My second to last favorite is this hand cream that I bought because a friend of mine told me it sounded cute. Really it does sound cute, but the fact that it is also a hell of a hand cream makes it better. The Soap and Glory Hand Food is a must have in any hand bag of every woman in the world. My hands have never been softer!!  (Get softer hands buy it here)
Just to finish up this "Super late March Favorites" I decided to add a Fashion Favorite!
While I was in London, I needed a bigger hand bag to carry some books and different things. So I entered to the New Look shop, and fell in love with this hand bag. It's called the Dark Grey Texture Panel Winged Satchel. I think that I've worn this satchel every day in the last 3 months. And it really fits everything in it. I mean it. EVERY-THING. (Buy it here


That's all for today guys!! I hope you enjoyed my blog post. I really hope you haven't missed me! I'll try to keep posting at least once a week! 
You can request post in the comments down below. Please I would love if you do it! Just tell me if you want more Beauty posts, Fashion posts, or even Personal posts!

Love you xxox
Jo

Sunday, September 21, 2014

Under the Fashion Spotlight: Olivia Palermo

1

Hey there!! I'm back with my "Under the fashion spotlight" and this time it's Olivia's time!!!

During these last Fashion Weeks, we all have seen the it girl keeping all the attention! With her gorgeous outfits and beautiful face and hair.

With her 28 years she out-stands in the fashion world keeping it classy but chic and daring!

Here are my top 5 outfits:


P.S. Please check out her blog to find out more about her and her style!

Monday, September 15, 2014

NYFW Street Styles!!

0

Hey everyone, I'm so sorry I haven't been posting lately, I've been going under some problems that I'm trying to solve.
But that's not the point of this blogpost! We are in that moment of the year when fashion is everywhere!
Some weeks ago Fashion week was celebrated in New York, and as I guess you can get all the info. online about it, I guess I could make a top 10 of the BEST STREET STYLES during fashion week!


Sunday, August 31, 2014

90s Famous Chokers + DIY

0

The 90s were a crazy and rad period for fashion.
I remember reading a while ago a post of 'Fashion trends that should never come back' or something like that, and guess what... Tattoo choker were there! But once again guess what... THEY ARE COMING BACK! 


Luckily for me, as I wasn't alive for most of the 90s, I'm really happy they are coming back. IT'S MY CHANCE TO WEAR THOSE MOTHER F**KERS!


Even celebrities like Emma Roberts and Katy Perry are wearing them, so we can say It's official right? 

Now, I'll make a DIY so if you can't find it anywhere near you, at least you can make one!

MATERIALS
STEP BY STEP:
1.Fold the stretch cord (I cut it about 2 arms long) and clip it to the hard surface! Like in the picture.
2.Now choose one side and make a curl like this one:
3.Now, take the other side and just put it inside the curl. (I know it's hard to understand) Or just look:


4.Ok, now do the same but with the other side, I mean make a curl and the pass the other side through the curl.

5.Now continue doing the same one time each side until you have the length that you want. (I'm making a bracelet for a choker you will need it to be a bit longer)
6.Once you have your desired length, tie a (or two) knot with the endings

7.Now with put the clasp on one ending and tie another knot to secure it.

8.Cut the remaining chord. (I like using the pliers to hold them)

9.Burn the endings to make sure it won't untie. (I also like holding them with the pliers so I don't burn)

CONGRATULATIONS NOW YOU HAVE YOUR OWN 90'S TATTOO CHOKER OR BRACELET!